Guide on Supply and Demand Zones in Forex
Forex trading, or the exchange of currencies, is a market that’s driven by two core principles: supply and demand. This means if more people want a currency pair (demand), the price goes up. Conversely, if more people want to sell a currency pair than buy it (supply), the price goes down. Understanding these forces and how they form supply and demand zones can dramatically improve your trading performance. Let’s explore these fundamental concepts in more depth.
The Supply/Demand Fundamentals
Supply and demand might sound like complex concepts, but they’re relatively straightforward. These economic principles determine the price of everything from groceries to stocks and, indeed, currencies. In Forex trading, supply refers to the quantity of a specific currency available, while demand refers to how much of that currency traders want to buy. The interaction of supply and demand influences currency prices, forming what we call supply and demand zones.
Understanding Supply and Demand Zones
Supply and demand zones arise from price fluctuations resulting from changes in supply and demand. A supply zone occurs when supply exceeds demand. This causes the price to fall until it reaches a level where demand matches supply – the demand zone. The price usually rises from this point as demand starts to exceed supply.
These zones show up in four common patterns: Drop-Base-Drop, Rally-Base-Rally, Drop-Base-Rally, and Rally-Base-Drop. If you can recognize these patterns, you’ll have a much better idea of where the market might be heading next. Below you can see two of them: Drop-Base-Rally and Rally-Base-Rally.

Spotting Supply and Demand Zones on Your Charts
Identifying these zones on your price charts is a crucial skill. A supply zone usually appears after a noticeable rise in price, indicating a potential reversal point. A demand zone, on the other hand, often shows up after a clear price drop, hinting that the price might start to climb.

However, it’s important to remember that not all zones are created equal. ‘Fresh zones,’ or zones that the price hasn’t returned to since their formation, often present more reliable trading opportunities. The stronger the initial price movement from a zone, the better the chances for a similar price reaction when the price comes back to that zone.
Trading Using Supply and Demand Zones
The basic strategy for trading using supply and demand zones is buying at demand zones (where you expect the price to rise) and selling at supply zones (where you expect the price to fall). However, the Forex market can be unpredictable, and there’s no guarantee that price movements will always behave as expected.
Risk management is crucial. For each trade, you should set a stop-loss level (the price at which you’ll exit if the trade goes against you) and a take-profit point (the price at which you’ll exit if the trade goes in your favor). As a rule of thumb, it is recommended to risk no more than 1% of your trading account on each trade.
The Role of Supply and Demand in Swing Trading
Swing trading is a strategy that aims to profit from price swings over days to weeks. In this approach, supply and demand zones can provide crucial entry and exit points. You enter a trade when price reaches a demand zone and shows signs of rising (for a buy trade) or hits a supply zone and seems to be falling (for a sell trade). You then exit the trade when the price reaches the take-profit point.
Price Charts: The Story of Supply and Demand
Price charts are a trader’s best friend. They tell a story about the market and how prices have reacted to changes in supply and demand. By understanding patterns and indicators, such as trend lines and candlestick patterns, traders can gain a clearer picture of where prices might be heading.
How Economic News Affects Supply and Demand
Major economic news releases can have a big impact on supply and demand in the Forex market. Changes in interest rates, employment numbers, and geopolitical events can lead to shifts in currency prices. It’s essential to keep up with the economic calendar and prepare your trading plan around these events.
Advanced Trading Techniques
Once you’re comfortable with the basics, you can try out more sophisticated strategies.
1. Confluence with Support and Resistance
Often, supply and demand zones align with major support and resistance levels, which can strengthen these zones. If a supply zone coincides with a significant resistance level, it might indicate a robust selling opportunity. Conversely, a demand zone aligning with a support level can suggest a strong buying opportunity.
2. Multi-timeframe Analysis
Using multiple timeframes can increase the reliability of supply and demand zones. High timeframe zones (such as daily or weekly) often carry more weight than those on lower timeframes (like hourly or 15-minute charts) because they represent larger market movements. Using a higher timeframe to identify zones and a lower one to refine entries and exits can be an effective strategy.
3. Price Action Confirmation
Price action patterns, such as pin bars or engulfing candles, can provide additional confirmation at supply and demand zones. For instance, a bullish engulfing pattern at a demand zone may signal a strong buying opportunity, while a bearish engulfing pattern at a supply zone could indicate a selling opportunity.

4. Indicator Confluence
Use of technical indicators such as Relative Strength Index (RSI), Stochastic Oscillator, or Moving Averages can provide additional evidence for trades. For instance, if price enters a demand zone and the RSI indicates the market is oversold, this could signal a strong opportunity to buy.

5. Breakout and Retest Strategy
After a price breaks through a supply or demand zone, it often retests the zone before continuing in the breakout direction. This retest can be an excellent opportunity to enter a trade in the breakout direction.

6. Zone Freshness
“Fresh” zones, which haven’t been revisited since their creation, can present more reliable trading opportunities. A supply or demand zone becomes weaker each time it’s revisited, and “fresh” zones are likely to result in larger price movements.

Building a Trading Strategy Around Supply and Demand Zones
Every successful Forex trader has a well-defined trading strategy that guides their trading decisions. In this part of the guide, we’ll explore a simple yet effective strategy that combines the power of supply and demand zones, the 21-period Exponential Moving Average (EMA), and the Average True Range (ATR) to help identify high-probability trades. Remember, you always need to backtest the strategy before taking it into the live markets trading capital.
Step 1: Identify Supply and Demand Zones
The first step in this strategy is to identify the supply and demand zones on your chart. These zones, formed by significant price movements, represent areas of major buying (demand) and selling (supply) pressure.
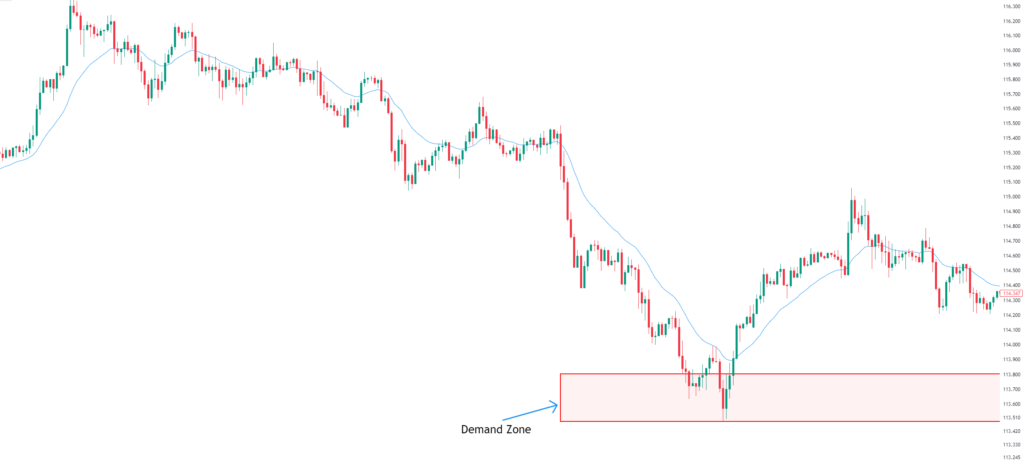
Step 2: Wait for Price to Enter a Zone
Once you’ve identified the supply and demand zones, the next step is to wait for the price to enter one of these zones. A clear indication that price is reacting to the zone can be seen when the price enters the zone and then starts to reverse.

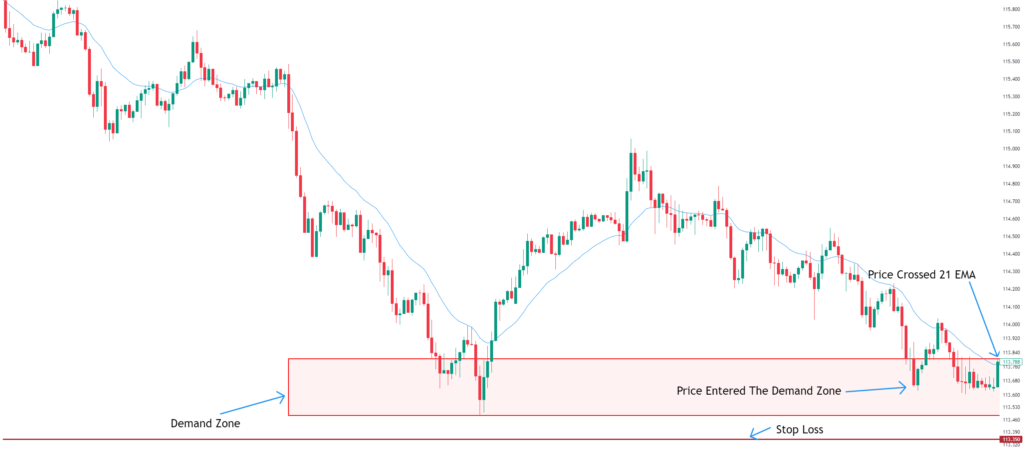
Step 3: Wait for Price to Cross the 21 EMA
In this strategy, we use the 21-period EMA as a signal line. When price crosses this EMA line, it can be a sign that momentum is shifting. For a buy setup, wait for the price to cross above the 21 EMA while in a demand zone. For a sell setup, wait for the price to cross below the 21 EMA within a supply zone.

Step 4: Calculate the ATR
The Average True Range (ATR) is a volatility indicator that measures the average range between the high and low prices over a specified number of periods. We use the ATR to set our stop loss.
Once price crosses the 21 EMA, calculate the ATR value. The standard setting for ATR is 14 periods, but you can adjust it according to your preference.
Step 5: Set Stop-Loss
A crucial part of any trading strategy is risk management. In this strategy, we set the stop-loss 1 ATR below the demand zone (for a buy trade) or 1 ATR above the supply zone (for a sell trade). This allows the trade some room to move while limiting the potential loss if the trade doesn’t go in our favor.
Step 6: Set Take-Profit
Finally, we need to determine our exit strategy. In this strategy, we use a 2:1 reward-to-risk ratio. This means our take-profit level should be twice the distance from our entry point to our stop-loss.
For instance, if your entry point is 100 pips above your stop-loss, you should set your take-profit level 200 pips above your entry point.
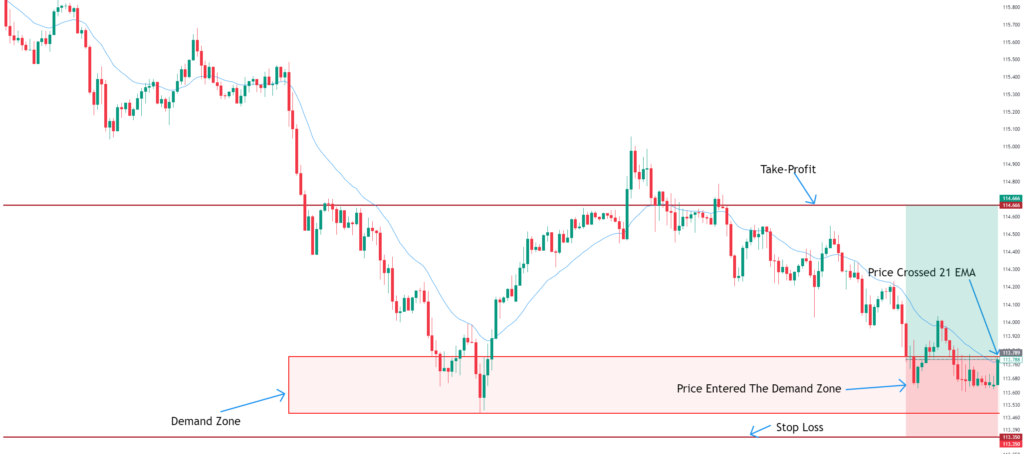
Step 7: Enter the Trade
You have done all of the heavy lifting. Now all you have to do is enter the trade at the close of the candle that crossed the 21 EMA and wait for price to either hit your Stop-Loss or Take-Profit.

Common Mistakes and How to Avoid Them
No one is immune to mistakes, especially when starting. Common errors include incorrectly identifying zones, not managing risk properly, or relying too much on technical indicators without considering underlying market dynamics. This is why it is important to document or journal the methods you are using to identify these zones in any forex market. Our advice is to create concrete rules using strict if/then syntax for your trading strategy. This will eliminate most of the subjectivity and make your zone identification skills improve almost instantly after implementing it in your trading plan. You can pivot in the future once you get more experience but most traders still keep rules in their trading strategy as it is one of the core principals of every successful trader.
Conclusion
While understanding supply and demand zones can significantly improve your trading, remember that there’s no magic formula for success in Forex trading. Continuous learning, adapting your strategies, and practicing sound risk management are crucial.
There are countless resources available to enhance your understanding of Forex supply and demand zones and Forex trading more broadly. Books, online courses, and trading communities are all excellent places to start. Remember, the key to success is not just learning but applying what you’ve learned. Happy trading!